LIGHTING FOR LIFE
WORKSHOP REFERENCES
SHOOT-OUT
September 25, 2022 (5pm - 8pm) Location: TBA Outdoors
Bring your lighting gear and work through some real life shooting scenarios with models.
In meantime, drop me a message with questions from the class.
Rob
405-620-5505
robert@trawickimages.com
Thanks for registering for the class! The class is designed for ALL SKILL LEVELS, however it would beneficial for students to have a solid understanding of exposure control and their camera settings. Here are some links and terms that could be helpful to review before the class.

Choose Your Light System Wisely!
Robert & Terri proudly choose FJ Westcott for our lighting and modifier needs. The FJ Lighting System has you covered from speed lights to 400w battery powered strobes, all using a universal trigger system so you never need to purchase different pieces when changing camera brands. And FJ Westcott has the BEST customer service in the industry. A real person will answer the phone during business hours!
(800) 886-1689
(419) 243-7311
Mon-Fri, 9am-5pm ET
Check out the full line of lights, modifiers, and accessories!
EXPOSURE
A photograph's exposure determines how light or dark an image will appear when it's been captured by your camera. Believe it or not, this is determined by just three camera settings: aperture, ISO and shutter speed (the "exposure triangle"). Mastering their use is an essential part of developing an intuition for photography.
UNDERSTANDING EXPOSURE
Achieving the correct exposure is a lot like collecting rain in a bucket. While the rate of rainfall is uncontrollable, three factors remain under your control: the bucket's width, the duration you leave it in the rain, and the quantity of rain you want to collect. You just need to ensure you don't collect too little ("underexposed"), but that you also don't collect too much ("overexposed"). The key is that there are many different combinations of width, time and quantity that will achieve this. For example, for the same quantity of water, you can get away with less time in the rain if you pick a bucket that's really wide. Alternatively, for the same duration left in the rain, a really narrow bucket can be used as long as you plan on getting by with less water.
In photography, the exposure settings of aperture, shutter speed and ISO speed are analogous to the width, time and quantity discussed above. Furthermore, just as the rate of rainfall was beyond your control above, so too is natural light for a photographer.
EXPOSURE TRIANGLE: APERTURE, ISO & SHUTTER SPEED
Each setting controls exposure differently:
Aperture: controls the area over which light can enter your camera
Shutter speed: controls the duration of the exposure
ISO speed: controls the sensitivity of your camera's sensor to a given amount of light
One can therefore use many combinations of the above three settings to achieve the same exposure. The key, however, is knowing which trade-offs to make, since each setting also influences other image properties. For example, aperture affects depth of field, shutter speed affects motion blur and ISO speed affects image noise.
The next few sections will describe how each setting is specified, what it looks like, and how a given camera exposure mode affects their combination.
SHUTTER SPEED
A camera's shutter determines when the camera sensor will be open or closed to incoming light from the camera lens. The shutter speed specifically refers to how long this light is permitted to enter the camera. "Shutter speed" and "exposure time" refer to the same concept, where a faster shutter speed means a shorter exposure time.
By the Numbers. Shutter speed's influence on exposure is perhaps the simplest of the three camera settings: it correlates exactly 1:1 with the amount of light entering the camera. For example, when the exposure time doubles the amount of light entering the camera doubles. It's also the setting that has the widest range of possibilities:
Shutter SpeedTypical Examples1 - 30+ secondsSpecialty night and low-light photos on a tripod2 - 1/2 secondTo add a silky look to flowing water
Landscape photos on a tripod for enhanced depth of field1/2 to 1/30 secondTo add motion blur to the background of a moving subject
Carefully taken hand-held photos with stabilization1/50 - 1/100 secondTypical hand-held photos without substantial zoom1/250 - 1/500 secondTo freeze everyday sports/action subject movement
Hand-held photos with substantial zoom (telephoto lens)1/1000 - 1/4000 secondTo freeze extremely fast, up-close subject motion
How it Appears. Shutter speed is a powerful tool for freezing or exaggerating the appearance of motion:
With waterfalls and other creative shots, motion blur is sometimes desirable, but for most other shots this is avoided. Therefore all one usually cares about with shutter speed is whether it results in a sharp photo — either by freezing movement or because the shot can be taken hand-held without camera shake.
How do you know which shutter speed will provide a sharp hand-held shot? With digital cameras, the best way to find out is to just experiment and look at the results on your camera's rear LCD screen (at full zoom). If a properly focused photo comes out blurred, then you'll usually need to either increase the shutter speed, keep your hands steadier or use a camera tripod.
APERTURE SETTING
A camera's aperture setting controls the area over which light can pass through your camera lens. It is specified in terms of an f-stop value, which can at times be counterintuitive, because the area of the opening increases as the f-stop decreases. In photographer slang, when someone says they are "stopping down" or "opening up" their lens, they are referring to increasing and decreasing the f-stop value, respectively.
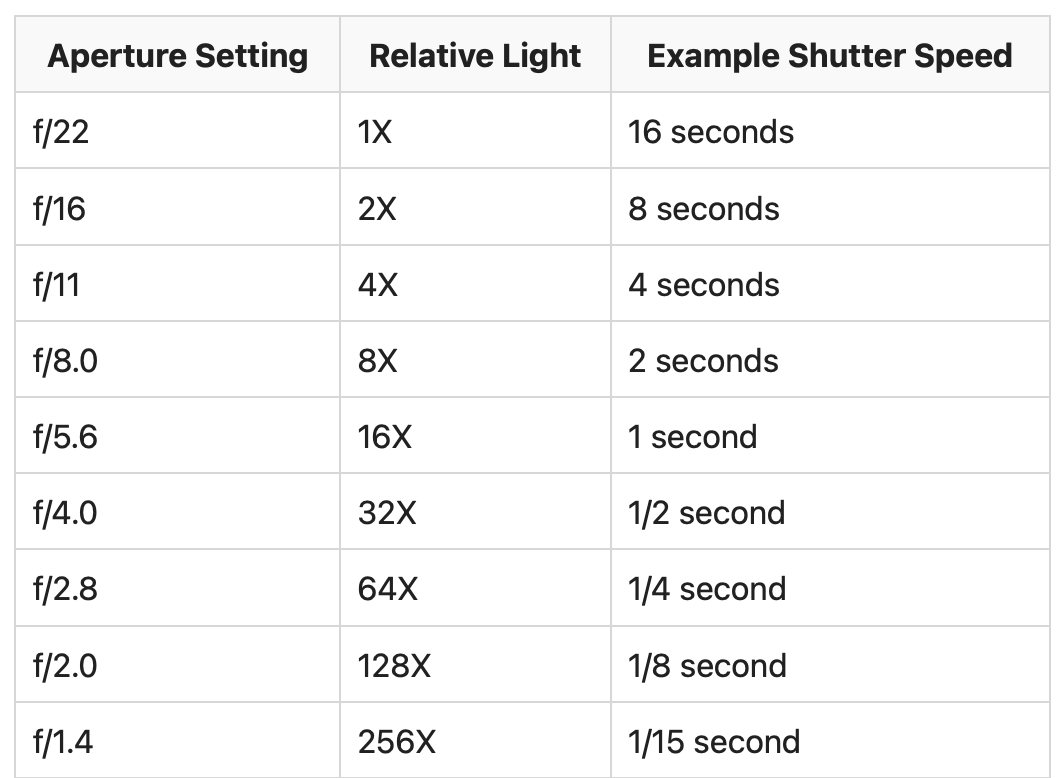
By the Numbers. Every time the f-stop value halves, the light-collecting area quadruples. There's a formula for this, but most photographers just memorize the f-stop numbers that correspond to each doubling/halving of light:
The aperture and shutter speed combinations all result in the same exposure. (right image)
Note: Shutter speed values are not always possible in increments of exactly double or half another shutter speed, but they're always close enough that the difference is negligible.
The f-stop numbers are all standard options in any camera, although most also allow finer adjustments of 1/2 or 1/3 stops, such as f/3.2 and f/6.3. The range of values may also vary from camera to camera (or lens to lens). For example, a compact camera might have an available range of f/2.8 to f/8.0, whereas a digital SLR camera might have a range of f/1.4 to f/32 with a portrait lens. A narrow aperture range usually isn't a big problem, but a greater range does provide for more creative flexibility.
ISO SPEED
The ISO speed determines how sensitive the camera is to incoming light. Similar to shutter speed, it also correlates 1:1 with how much the exposure increases or decreases. However, unlike aperture and shutter speed, a lower ISO speed is almost always desirable, since higher ISO dramatically increases image noise. As a result, ISO speed is usually only increased from its minimum value if the desired aperture and shutter speed aren't otherwise obtainable.
note: image noise is also known as "film grain" in traditional film photography
Common ISO speeds include 100, 200, 400 and 800, although many cameras also permit lower or higher values. With compact cameras, an ISO speed in the range of 50-200 generally produces acceptably low image noise, whereas with digital SLR cameras, a range of 50-800 (or higher) is often acceptable.
CAMERA EXPOSURE MODES
Most digital cameras have one of the following standardized exposure modes: Auto (A), Program (P), Aperture Priority (Av), Shutter Priority (Tv), Manual (M) and Bulb (B) mode. Av, Tv, and M are often called "creative modes" or "auto exposure (AE) modes."
Each of these modes influences how aperture, ISO and shutter speed are chosen for a given exposure. Some modes attempt to pick all three values for you, whereas others let you specify one setting and the camera picks the other two (if possible). In addition, the camera may also have several pre-set modes; the most common include landscape, portrait, sports and night mode. The symbols used for each mode vary slightly from camera to camera. However, keep in mind that most of the above settings rely on the camera’s metering system in order to know what's a proper exposure. For tricky subject matter, metering can often be fooled, so it's a good idea to also be aware of when it might go awry, and what you can do to compensate for such exposure errors.
Finally, some of the above modes may also control camera settings which are unrelated to exposure, although this varies from camera to camera. Such additional settings might include the autofocus points, metering mode and autofocus modes, amongst others.
COLOR PROFILES
Online References for Adjusting Color Parameters
FUJIFILM
Fujifilm Film Simulations: More Than A Marketing Gimmick
Understanding Custom Film Simulations
Fujifilm’s Film Simulation Modes and What They Are Actually Doing To Your Images
NIKON
Getting the most from Nikon Picture Control Settings
Best Nikon Picture Control Settings
CANON
QuickGuide to Picture Style Settings and Customization
BASIC LIGHTING TERMS
Ambient
Light that is present in a scene, often originating from the Sun or an artificial light source such as a bulb. Ambient light is controlled using shutter speed and aperture. When mixing ambient with flash, photographers resort to controlling ambient with shutter speed as it allows to keep the preselected depth of field. More often than not photographers shoot wide open in ambient light situations, so the shutter speed is the only option(assuming ISO is already high).
Artificial
The light that is generated by an electric flash tube or an unnatural source. Usually comes from a flash and is often what you can control. Although light bulbs in an event venue are artificial light, most photographers regard them as ambient if there is no control over them.
Backlight
A light that comes from behind a subject. A backlight increases background separation as it highlights the edges of your subject. An effective backlight is often hard but not too bright.
Broad Light
A portrait lighting pattern where the whole face is lit evenly. The light direction is hitting the cheekbone.
Catchlight
The reflection you see in the eyes of the model. A square light source will produce a square catchlight, a round one-round.
Clipping
When highlights, commonly skin parts, are overexposed to the point of no return. Can be fixed by dialing the power down or talking to the makeup artist about it.
Columella
Area of the nose with the nostrils. It is generally good to keep it darker than the nose bridge.
Continuous Lighting
Light source that has constant output over time e.g. a tungsten 3200W light. Commonly used in video. Strobes feature a high but not constant output of light.
Contrast
The difference between highlights and shadows in an image.
CTB
Colour temperature blue gel: used to cool the light down.
CTO
Colour temperature orange gel: used to warm it up.
Diffused
Light that hits the subject from a wide family of angles.
Falloff
The measure of how fast light loses power over distance. Follows the inverse square law for small light sources.
Fill
Commonly a large diffused light source used to bring out shadow detail and reduce contrast.
Flag
A studio accessory used to cut light or introduce negative fill.
Gel
A piece of semi-transparent plastic that will color the light. Don’t use gels with modeling lamps as they melt.
Gobo
(1) An optical attachment used to create precise light patterns, or (2) a flag (or diffusion fabric) with holes that is used to cast uneven natural-looking shadows.
Gradient
The transition between highlight and shadow. A smooth gradient suggests diffused light, a hard gradient suggests hard light.
Guide Number
A quantity describing what f-stop or distance to use if one of the two is known. Guide number is f/stop multiplied by distance. Most on-camera flash manufacturers give these in manuals.
Hard Light
Light with sharp shadow edges and little to no gradient. It is defined only by shadow edges, not contrast or scene.
High-Key
A scene that is largely bright or white. Commonly used in headshot photos and can be done with minimal gear.
Hotspot
Part of the surface that is significantly brighter than the rest. Commonly used with softboxes that have a hotspot in the center.
Incandescent
A light source that is producing relatively warm light by burning a filament. These light sources are often inefficient and currently are rarely used in professional applications.
Inverse Square Law
Relationship between light brightness and distance. Light intensity/brightness will decrease in inverse proportion to the square of the distance.
Key Light
The brightest light on the subject.
Kicker
A light used to highlight the contour of the subject and separate it from the background- commonly placed behind it.
Lighting Ratio
The exposure ratio between shadow and highlight. A high lighting ratio means a lot of contrast while a low one means no contrast.
Low-Key
Photo that is largely dark/shadow. Unlike high-key, the key light will be very prominent here while everything else will fall into shadow. Much harder to do compared to high-key as it requires more nuanced light shaping.
Penumbra
The area between shadow and highlight. A large penumbra means smooth gradient, a small one means hard light and no gradient.
Quality of Light
Described in terms of 4 things: hard, soft, diffused, specular. Some regard high quality of light to be something soft, but this puts hard light in jeopardy hence I advise against this version of the definition.
Ring flash
A special flash that mounts around the lens and creates even light that doesn’t cast visible shadows.
Self-Shadow
A shadow that appears because of the change in the shape of the object (e.g a dark edge of a cube)
Shadow edges
Fancy light nerds will call this penumbra. See above.
Short light
A portrait lighting technique where the front of the face is bright while the cheeks remain dark. The light direction is hitting the face.
Soft Shadow
A shadow that has long graduated transitions from highlight to shadow. The term ‘shadow edges’ doesn’t practically apply as they are extremely large and hard to pinpoint.
Spill
The angle at which the light spreads over the area. A spill kill or a grid will reduce the light spread (spill) to a smaller angle (e.g. 5 deg)
Thrown Shadow
A shadow that is cast by an object to a different surface, e.g a shadow on the table from a cup.
VIDEO RESOURCES
These are some of the photographers I follow on YouTube for lighting and inspiration.